A refinished dining table can breathe new life into an old or tired piece of furniture. With the right know-how and a little bit of elbow grease, you can transform your dining table into a stunning centerpiece for your dining room. In this guide, we’ll walk you through the entire process of refinishing a dining table, from gathering the necessary materials to touching up any imperfections and maintaining the finished product. Let’s get started!
Gathering the Necessary Materials
Before you begin the DIY process of your dining table makeover, you can gather ideas from social media like Pinterest and Facebook etc. In addition, you need to prepare the following materials beforehand:
- Protective gear such as gloves, goggles, and a mask
- Drop cloth
- Wood-safe all-purpose cleaner
- Chemical stripping agent
- Putty knife or scraper (preferably plastic to avoid scratching the wood)
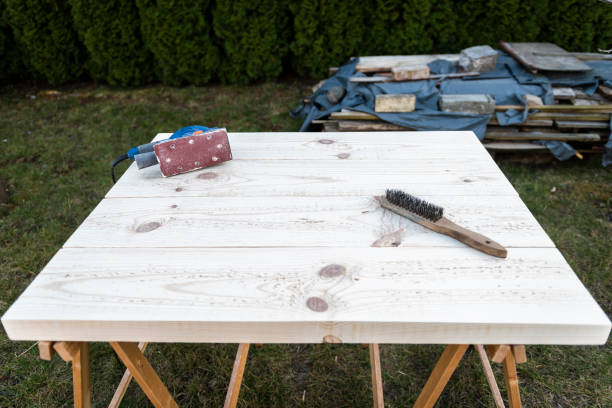
- Wire brush
- Sandpaper in various grits (60-100, 150, and 220)
- Steel wool (medium-coarse and grade #000)
- Tack cloth
- Wood stain of your choice
- Sealant or varnish (polyurethane, tung oil, or wax)
- Paintbrushes and disposable brushes
- Cotton rags or cheesecloth
- Mineral spirits
Materials Gathering List
| Material | Purpose |
| Protective gear | To ensure safety while working; includes gloves, goggles, and a mask |
| Drop cloth | To protect your workspace |
| Wood-safe cleaner | For cleaning the table before refinishing |
| Chemical stripping agent | To remove the existing finish |
| Putty knife, scraper | For stripping old finish; preferably plastic to avoid scratching wood |
| Wire brush | To help remove stubborn old finish |
| Sandpaper (60-100, 150, 220) | For smoothing the wood surface in progressive steps |
| Steel wool | To smooth wood between finish coats; medium-coarse and grade #000 |
| Tack cloth | To remove dust and debris before staining |
| Wood stain | To achieve the desired color |
| Sealant or varnish | For protecting the wood; options include polyurethane, tung oil, or wax |
| Paintbrushes, disposable brushes | For applying stain and sealant/varnish |
| Cotton rags, cheesecloth | For wiping excess stain and applying some types of finish |
| Mineral spirits | For cleaning brushes and diluting some types of stains and finishes |
Preparing Your Work Space
Before starting the refinishing process, it’s essential to set up a well-ventilated workspace where you can safely and comfortably work on your dining table top. Ideally, this should be a garage, partially enclosed porch, or outdoor work area. Place your table on a wide drop cloth to protect the surrounding area from any spills or debris and ensure that you can leave the table undisturbed while it dries.
Removing the Old Finish
The first step in refinishing your dining table is to remove the old finish. If the table has a stained finish, you’ll need to use a a chemical stripper to remove the existing stain or varnish. Be sure to read the manufacturer’s instructions for the specific stripping agent you’re using, as the recommended application time may vary.
Start by applying the stripping agent generously to the table’s surface using a paintbrush. Allow it to sit for the recommended time before using your putty knife or scraper to gently remove the softened finish, working in the direction of the grain of the wood finish. For detailed or rounded areas, use a wire brush to carefully remove the finish from any grooves or crevices.
Once you’ve removed the majority of the old finish, use medium-coarse steel wool to apply more stripping agent directly to the wood table’s surface. Instead of using a brush, gently rub the steel wool across the wood tone furniture to remove any stubborn bits of finish and work the stripping agent into the remaining areas.

Sanding Your Dining Table
After removing the old finish and cleaning the table’s surface, the next step is to sand the wood. Start by sanding the entire table with coarse-grit sandpaper (60-100 grit), working in the direction of the wood grain. Be careful not to cut into the wood with the edge of the sandpaper or sander. Gradually move to finer grits (150 and 220) with each pass, ensuring a smooth surface.
For curved or carved areas of the table, use grade #000 steel wool to gently sand these more intricate spots. Once you’ve finished sanding, use a tack cloth to remove any remaining dust, residue or debris from the table’s surface.
Staining Your Dining Table
Once your wood dining table is sanded and prepared, it’s time to add a fresh, beautiful color with a new stain. To achieve the desired look, pick a stain and wood conditioner that matches your preferred color and style such as satin finish. Pay close attention to the manufacturer’s instructions on the stain container, as proper application is crucial for optimal results.
Begin by applying the stain using a paintbrush, making sure to follow the direction of the wood grain. As you go along, let the stain settle for a few seconds before gently wiping away the excess using a cotton cheesecloth or rag. This step helps to ensure an even coat while preventing over-saturation.
If you’re aiming for a darker, richer color, multiple coats of stain might be necessary. To achieve the best results, allow each coat to dry fully (typically overnight or at least 24 hours) before moving on to the next application. Before the second coat, remember to lightly sand the tabletop with fine-grit sandpaper. This intermediary step ensures better adherence of subsequent coats and a smoother final appearance.
Applying Sealant or Varnish
To ensure the longevity of your refinished dining table, safeguard its stunning finish by applying a sealant or varnish. There are several great options available, including clear polyurethane, some oil-based materials, and wax. By consulting the manufacturer’s instructions, you can confidently choose the right product for your specific needs.
To apply the sealant or varnish, spread it evenly across the entire surface of the table. To enhance both durability and protection, consider applying at least two coats. Between each application, allow the layer to dry fully. Lightly sand the surface in between coats, ensuring a superior finish and better adhesion of the subsequent layer. By following these guidelines, you can effectively maintain and showcase the beauty of your refinished dining table for years to come.

Drying and Buffing Your Dining Table
Following the application of the final coat of sealant or varnish, let your dining table dry entirely. The drying process typically takes at least 24 hours, although some variations may occur depending on the product used and the surrounding environmental conditions. It is essential to let the table dry completely to avoid any damage to the finish.
Once you’re certain the table is dry, proceed to buff the surface using a clean cotton rag. This step is particularly important if you’ve chosen tung oil as your finishing product. Buffing enhances the table’s appearance by giving it a polished, smooth look and feel. By taking the time to properly buff your dining table, you’ll accentuate the beauty of your handiwork and ensure a visually appealing result.
Touching Up Any Imperfections
If you notice any imperfections or missed spots after the refinishing process, don’t worry! You can touch up these areas by lightly sanding and reapplying stain or sealant as needed. Be sure to let any touch-up work dry fully before using the table.
Tips for Maintaining Your Refinished Dining Table
To ensure that your refinished dining table remains beautiful and functional for years to come, follow these maintenance tips:
- Clean regularly: Gently wipe your table with a soft cloth, dampened with warm water and a mild dish soap to clean the surface. Avoid using harsh chemicals or abrasive cleaning materials, which can damage the finish. Dry the table thoroughly after cleaning to prevent moisture damage.
- Use placemats and coasters: Placemats help protect the table’s surface from scratches, moisture, and heat, while coasters prevent damage from wet or hot dishes and drinkware. Invest in durable, high-quality placemats and coasters that complement your table and dining decor.
- Prevent heat damage: Avoid placing hot pots, pans, or serving dishes directly on the table’s surface, as this can cause damage to the finish. Instead, use trivets, heat-resistant mats, or table protectors to shield your table from heat.
- Protect from sunlight: Prolonged exposure to sunlight can cause the color of your dining table to fade over time. Position your table away from direct sunlight, or use window coverings like blinds or curtains to diffuse sunlight and protect the table.
- Be mindful of humidity: Excessive humidity can cause wood to expand and contract, potentially leading to warping, splitting, or cracks. Maintain consistent indoor humidity levels (between 40% and 60%) to protect your table and other wood furniture.
- Avoid dragging objects: When placing or moving items on the table, lift them instead of dragging them across the surface to prevent scratching the finish.
- Address minor damages quickly: If you notice minor scratches or damage to your table’s finish, address the issue promptly. You can use a touch-up pen, wood filler, or furniture wax to conceal small imperfections and maintain the table’s appearance.
- Refresh the protective finish periodically: Over time, the protective finish on your dining table may wear down due to regular use. To maintain the table’s durability, apply a fresh coat of protective finish (polyurethane, wax, or varnish) according to the manufacturer’s recommendations.
By following these maintenance tips, you can enjoy your refinished dining table for a long time and keep it looking its best. Regular care and attention will ensure your table continues to serve as a beautiful and functional centerpiece in your dining area.

Refinishing Your Dining Table: Frequently Asked Questions
As you embark on the journey of refinishing your dining table, it’s natural to have questions and concerns. In this section, we address some frequently asked questions related to the refinishing process, helping to ensure a smooth and successful outcome.
Common Q&A
Q: How long does it take to refinish a dining room table?
A: The time required to refinish a dining room table varies depending on factors such as the table’s size, the number of layers of paint or stain, and the drying time for your chosen products. Generally, you should expect the entire process to take anywhere from a few days to a week, allowing ample time for drying between coats and ensuring a high-quality result.
Q: What is the best type of finish to use on a dining room table?
A: Choosing the right finish for your dining room table depends on your desired look and the level of protection you require. Polyurethane is a popular choice due to its durability of heat and water-based resistance. Varnish adds a shiny finish and offers excellent protection, while wax provides a more natural look and feel with moderate protection. Consider your specific needs and preferences when selecting the best finish for your table.
Q: Can I refinish a veneer dining table?
A: Yes, you can refinish a veneer dining table, but it requires extra care and attention. Veneer is a thin layer of wood glued to a stable substrate, making it more delicate than solid wood. When sanding, be cautious not to sand through the veneer, as it could ruin the surface. Additionally, be gentle when applying stain or paint, as excessive pressure could cause damage.
Q: Can I use chalk paint to refinish my dining table?
A: Chalk paint is a popular choice for refinishing furniture due to its versatility and ease of use. It adheres well to various surfaces without the need for extensive sanding or priming. When using chalk paint on a dining table, be sure to apply a protective finish such as wax or clear polyurethane to protect the surface from daily use and wear.
Q: How do I maintain my refinished dining table?
A: To keep your refinished dining table looking beautiful for years to come, implement regular cleaning and maintenance practices. Wipe up spills immediately to prevent staining, use placemats and coasters to protect the surface from heat and moisture, and avoid dragging sharp or heavy objects across the table. Periodically, apply a fresh coat of protective finish as needed to maintain its appearance and durability.
By addressing these common questions, you’ll be well-prepared to tackle the task of refinishing your dining table, resulting in a stunning piece to enjoy for years to come. With patience, dedication, and attention to detail, you can successfully breathe new life into your antique dining table and create a beautiful centerpiece for your home.
Conclusion
To sum up, refinishing a dining table is an achievable and rewarding DIY project that can transform an old or tired piece of furniture into a beautiful and functional centerpiece for your dining area. By following the step-by-step guide provided, gathering the necessary materials, and paying close attention to the refinishing process, you can create a stunning result that echoes your personal taste and style. Additionally, addressing common questions and concerns will prepare you for a smooth and successful refinishing experience. Regular care and attention to maintaining your refinished table will ensure that it remains beautiful and functions well for years to come. With dedication, patience, and an eye for detail, you can breathe new life into your dining table, transforming it into a cherished and striking element of your home.